Pictorial Planet
Please become a Patreon of my work. You get special videos just for Patreons. You also support my website and YouTube work. Just check out the two tiers and decide what you might want as value benefits. Just click the link below…
Developing your first film
Subscribe to our new newsletter!
NEW!!!
Subscribe now to my new YouTube channel for tricks and tips on developers, darkroom work and photography.
Developing your film
The following text is very simplified from my book:
Some of you reading this will be developing for the first time and will surely need some help in getting started. One of the first questions you will ask will be, “How do I actually develop this thing?” There will be an element of trepidation at first but by the time you have read this chapter you will be in good shape. I mean that! Here is my method for developing a film.
Stage 1. Getting the film into the developing tank
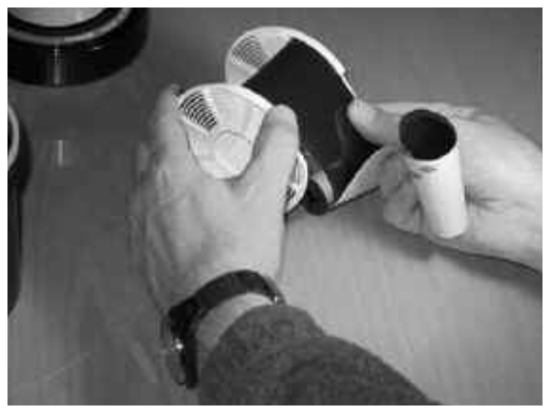
You’ve got your film out of the camera and you need to develop it. You now need to get it into the developing tank without exposing it to light.
With 35mm film, I want you to make sure you have the film tongue sticking out of the film cassette. If your camera rewinds the whole film into the cassette (and you cannot set the camera to leave the tongue out) you are going to need a Film Leader Retriever. This useful device pulls the film tongue back out of the cassette without damaging the film. You’ll understand why we need the tongue out later.
Loading the reel
You need to get an old film and practice loading it onto the developing tank reel. Watch what you are doing carefully and learn how the reel works. The film has a natural curl so make sure you are not fighting this - it should curl in towards the reel. There's loads more details in the book but this practice phase is really important. Practice makes perfect!
My book covers them in much more detail but I wanted you to have the basic steps here.
1. Dry the reel gently, with warm air from a hair drier, making sure the reel does not get at all hot or it might melt. A dry and clean reel is a happy reel.
2. Set up all the jugs etc. you'll be using on the surface you will be working on.
3. With 35mm only: Start the film off just on the reel grooves before turning out the light - but do not pull it out too far.
4. Load the film onto the reel.
6. When you reach the end of the film, cut it carefully with scissors and finish off loading it on the reel with a few more twists. This ensures it is away from the edge of the reel (and therefore the tank) and helps the movement of developer around it.
7. Place the reel and loaded film into the tank, reel side down.
9. Screw the tank lid back on carefully so as not to cross thread it.
Congratulations... the hardest part is over!
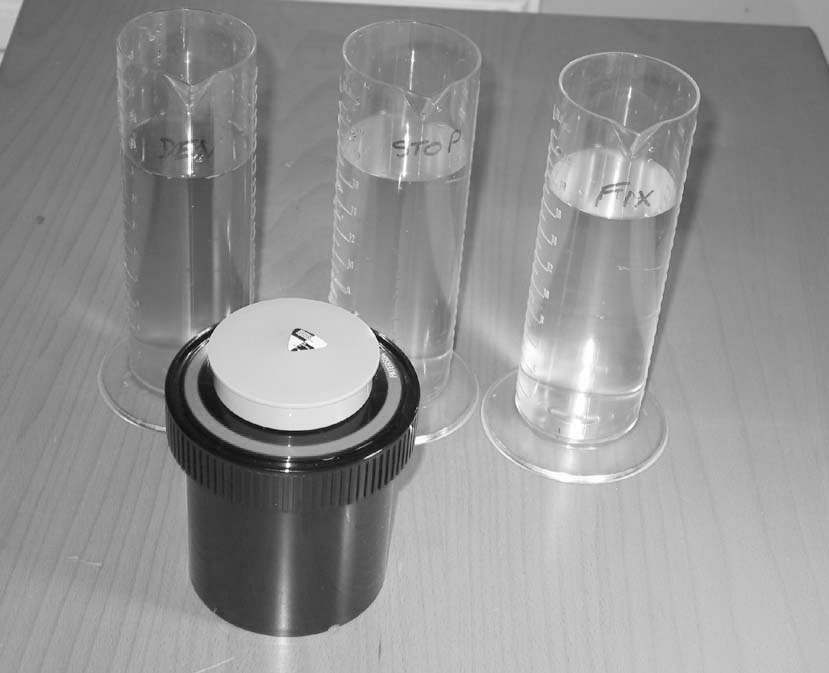
Take your stock developer and mix it down to working dilution with water making enough for your developing tank, the amount is usually written on the bottom of the tank.
Pour the same amount of Stop bath and Fix in to their respective jugs.
Line up your solution jugs in the following order:
Developer Stop bath Fix
Finally, you will need a large 2 litre jug containing water. This will be used for our film washing.
Make sure each of your mixed solutions is at 20 degrees centigrade. Get used to maintaining this temperature throughout the development period. With practice it will become easier.
Stage 3. Developing the film
We are just about ready to develop our film. We have the film in the developing tank. We have the solutions lined up at the right temperature and in the right order.
Ok, get your clock ready; your timing is critical so you'll need a clock with a second hand! You must be very accurate.
There is some general advice I can give about film developing times:
• Try not to use any time of less than 5 minutes. It’s too short to be consistent and any small error of timing (e.g. pouring in or out) can spoil the negatives. There’s also more chance of uneven development with such short times (and therefore such concentrated developer). Instead, use dilutions that give you times of over 10 minutes to start with.
Timing your development
Prepare to develop your film…. here goes….
1. Watch the second hand sweep round until there’s 10 seconds to go to a full minute.
2. Start pouring the developer into the tank quickly but carefully. By the time it’s all in, the second hand will be at the full minute and you are starting to time the development.
3. Pop on the water proof lid and immediately start gently agitating the film in the tank for 30 seconds, either with the twisting tool if supplied or by gently inverting.
4. Now set the tank down in the water bath and wait one minute. Invert (or twist) twice again. Set down, wait a minute, agitate again, and so on.
Finishing development
5. Twenty seconds before the end of the development period, pour out the developer.
6. At the moment development time is complete, pour in the stop bath. This very quickly arrests the development. Don’t panic about a few seconds. As you practice, you will improve in your pouring and become more precise with your timing.
Fixing the film
7. It’s now time to fix the film.
8. Pour out the stop bath. Pour in the fix. Agitate gently for two minutes and empty the fix back into its jug. You can open the tank and look at the film now. If it's at all milky you need to fix longer but if there's no milkiness you are done with fixing. (Much more details in my book about this stage.)
Washing the film
9. Wash the film now using this method by Ilford:
• First make sure you emptied the fix back into its jug. Now, fill the tank with clean water at 20c and lift and dunk the reel 5 times.
• Empty and repeat, this time dunking 10 times.
• Finally, empty and refill with fresh water. Lift and dunk 20 times
• Add a last rinse of water to the tank and one drop of Edwal LFN wetting agent or Ilford Ilfotol.
Stage 4. Post development
Drying the film
10. Remove the film carefully from the reel and hang the film with clips to dry in a dust free atmosphere.
Wow, you've done it!
There's many tips and trick around this that I describe at length in The Art of Black and White Developing and I really recommend you buy it for those and the many more in-depth descriptions and explanations it contains.
